How to test a Chrome Extension? (QA)
Written by our good friend Charlie Day from PrettyPrompt
If you’ve ever built a web app you know sharing the latest release for QA can actually be quite smooth. You connect your staging branch to Vercel (or whichever PaaS you’re using) and it’ll create a preview for you with a nicely contained URL.
You then drop this URL on the Slack QA channel for the rest of the team to try and break. You list the things that have changed so they know what to test first and then basically have a bit of click around to make sure everything functions correctly (this is after any automated tests).
Chrome Extensions are a slightly different beast. This is because they’re powerful. Far more powerful than web applications. With web applications you’re restricted to functionality within the web page, with extensions you can improve the functionality of the browser itself.
It’s the difference between using city public transport (a Web App) and having your own car (Chrome extension).
Problem 🔥
It’s hard to share non-production builds of Chrome Extensions within the Team.
You can’t simply create a URL and share that with rest of the team, they need to upload it to their Chrome Browser directly. However, Chrome is very particular with what you can and cannot upload.
Essentially, Chrome prevents you from shooting yourself in the foot and won’t let you upload any extensions that have not been signed by Google. This is great for users because there’s a high level of scrutinisation that goes into every line of code that gets uploaded to the CWS (Chrome Web Store) so you know you’re using safe extensions on your machine.
However, they’re only signed after they’re uploaded.
A bit of a Catch-22. Or so we thought.
Solution 🔧
After working on Pretty Prompt for the past couple of months and QA’ing it to an inch of it’s life we’ve come up with 2 ways you can share extensions within the team.
Method 1
Download the CRX file manually
Let’s say you have Version 1 of your app in production and you want to QA Version 2 before you submit to Chrome to be reviewed by the Chrome Developer Team.
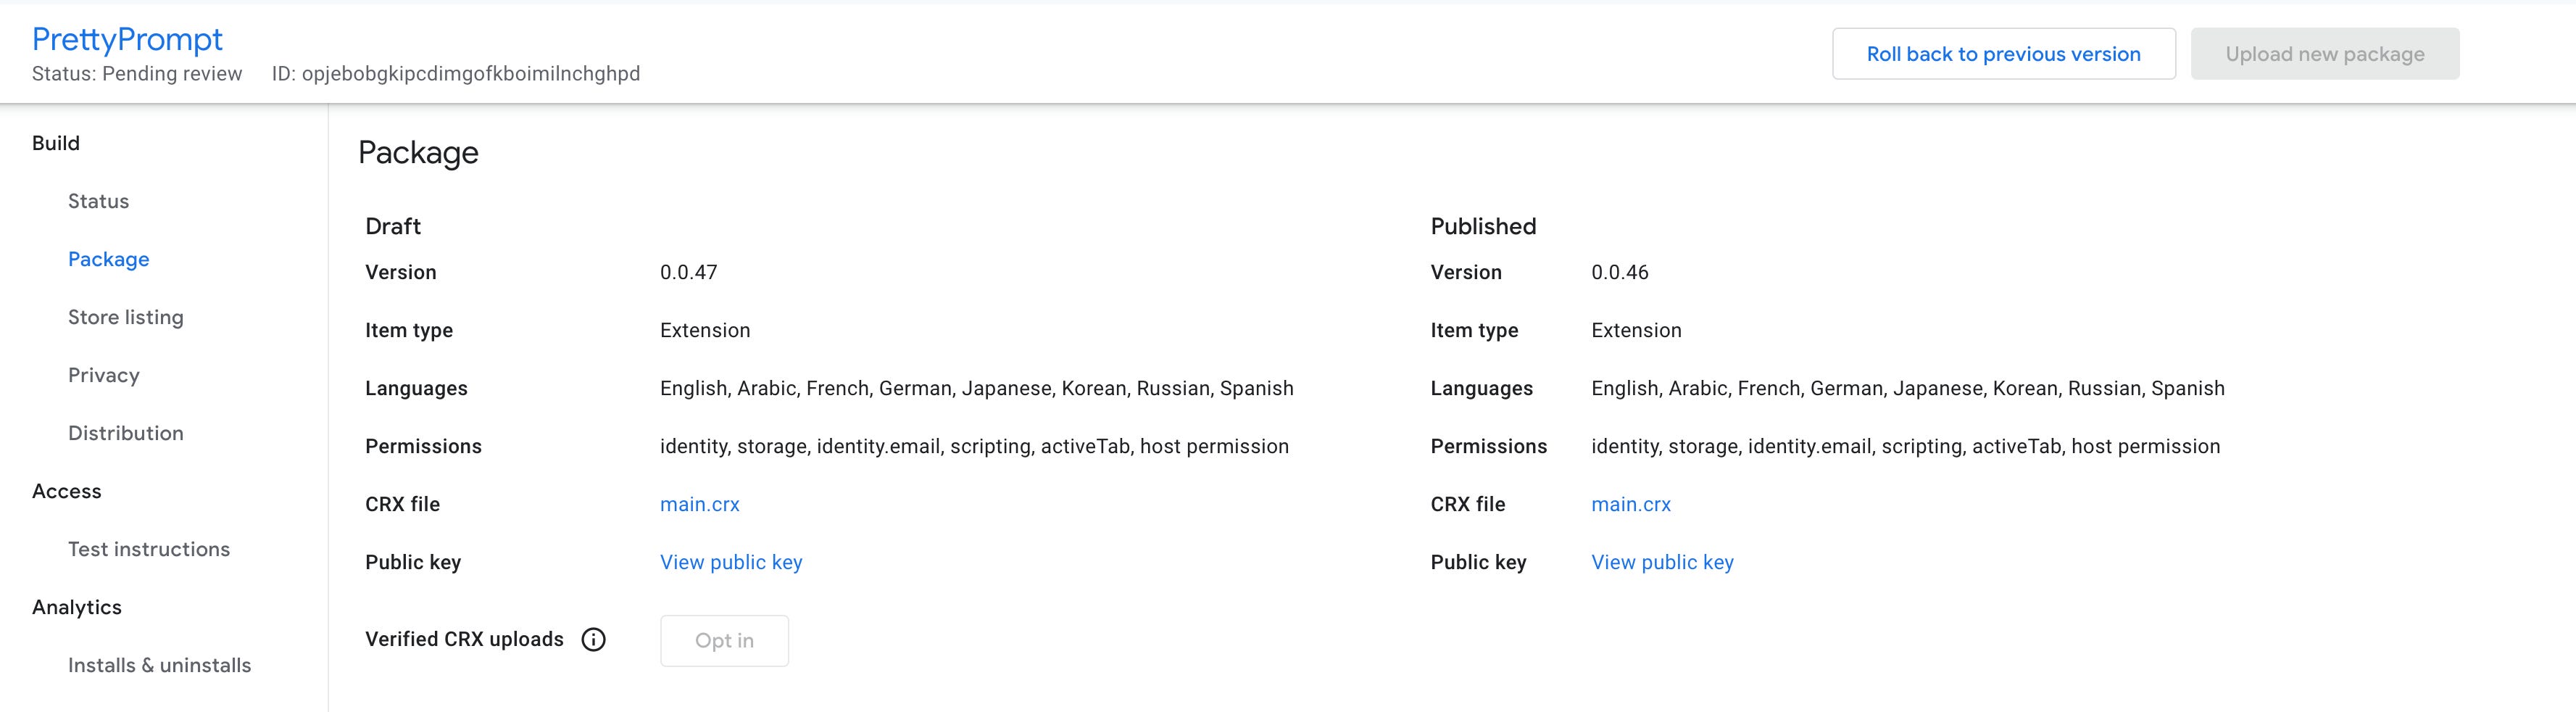
What you can do is Upload it first, but don’t submit it. This will place your app in Draft state, a sort of Chrome Extension limbo.
While this doesn’t send your app off for review (yet) it does mean it’s signed by Google and creates a main.crx file you can right click on and Save Link As…
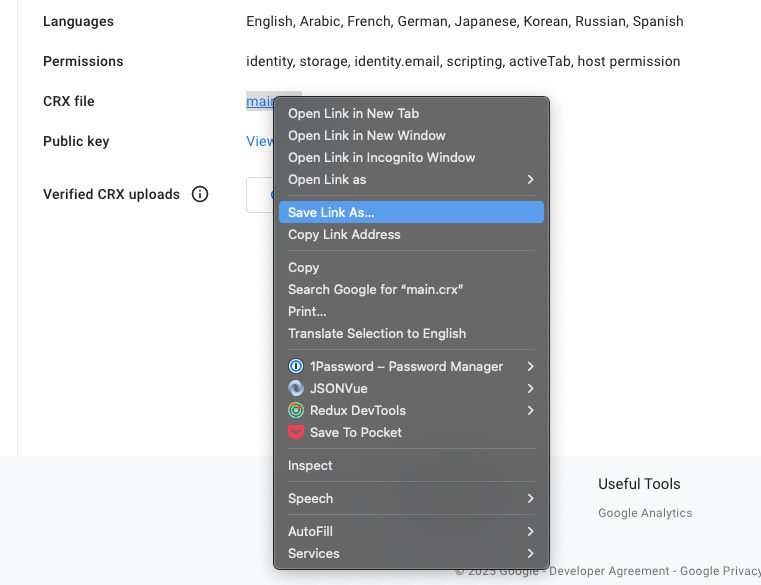
This will download a CRX file with the Extension ID prefixed. You can then share this CRX file around the company (they need to simply drop and drag to their chrome://extensions page).
Cons
While this method is quick and easy (because you’re using the same Extension ID) there are a few drawbacks to this. It only works for a single release and if you’ve already sent the release off for a review you’ll have to wait until the review comes back before you can upload another one.
This means we need another way…
Method 2 (Recommended)
Setting the Extension ID Yourself
We’re going to have do it ourselves.
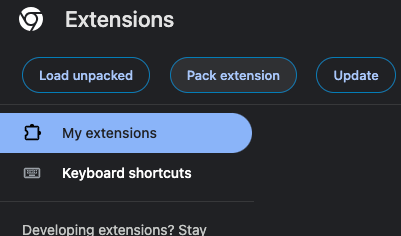
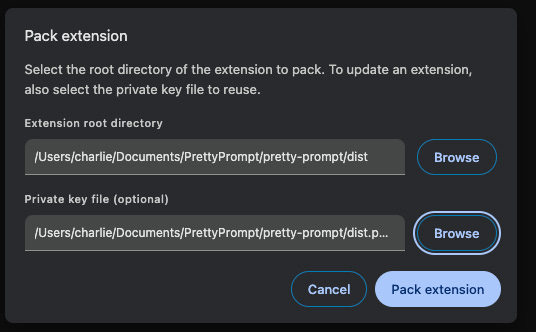
The first thing we can do is head over the chrome://extensions panel and we’re going to click Pack extension (note: make sure to have Developer mode toggled on - it’ll be in the top right hand corner).
Upload your packaged Chrome extension but leave the Private key file (Optional) empty. This is so Chrome can generate a .pem key for you.
A pem key is simply a way for Chrome to verify that you are the owner of the extension you’re uploading and it’s not some malicious extension that’s found its way onto your machine.
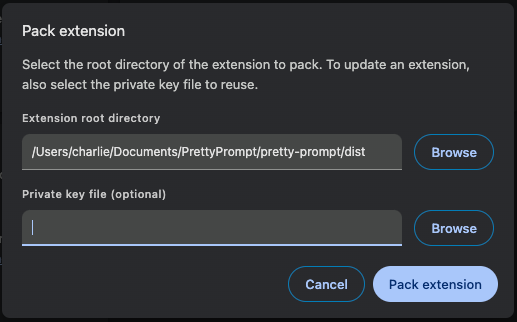
After clicking on Pack extension Chrome will sign your extension and in the same directory create a dist.crx (this is your extension) and dist.pem (this is your key) file.
Now we can distribute it around the company via the CRX file. If you drag and drop the dist.crx file into chrome://extensions you’ll likely be greeted with a Warning from Chrome saying it’s not listed in the Chrome Web Store. This is expected.
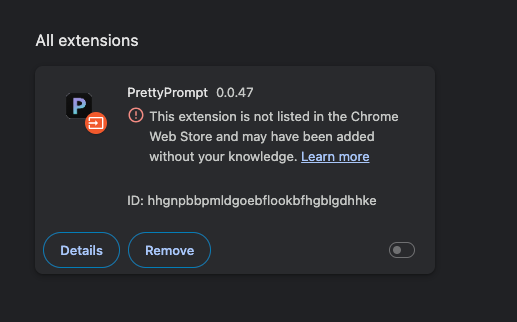
This is because you’ve uploaded a Chrome Extension with an unsigned Extension ID (which was defined by Chrome when we clicked on Pack extension) however Chrome is saying this is not recognised as a legitimate extension.
You (and any member of your team that wants to try the non-production extension) need a way to update your chrome policy to enable your browser to accept custom Extension IDs. When you pack your extension Chrome doesn’t automatically do this for you.
A Chrome Policy is an admin setting which enforces security and privacy features for users. Essentially, it’s a bouncer at a night-club. 🛡️
There’s multiple ways to do this and one good way that’ll work for everyone we’ve found is to use the repository: https://github.com/GoogleChromeLabs/extension-update-testing-tool.
This is a great project from the Chrome Extension Team for testing how updating an Extension between versions will effect users (e.g. you change a permission and get a warning) however it’s also got a great functionality to directly update your policies in chrome. You can clone it directly onto your machine via:
git clone https://github.com/GoogleChromeLabs/extension-update-testing-tool
To install local dependencies you can run:
npm install
Now to get it started we need to go and fetch our dist.pem key (we generated when we clicked on Pack extension) and place it into the directory and rename it key.pem. Now run:
WRITE_KEY=1 npm start
The WRITE_KEY=1 flag indicates that the code will look at our key.pem file and use that instead to determine the Extension ID (if not, a random ID will be generated). If you head over to http://localhost:8080/ you’ll see the extension tool running.
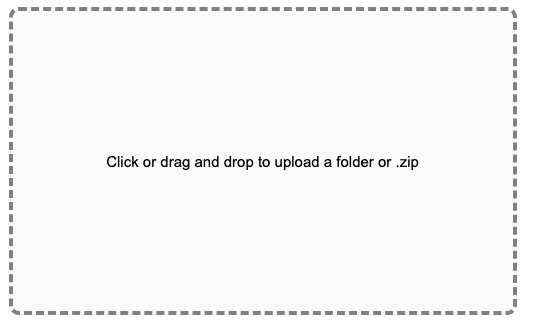
Drop and drag your dist folder (or your extension zipped - whatever you upload to the developer store) into the area to upload your extension. This will help us generate a policy for the ID.
Install the policy manually by clicking on the policy.mobileconfig link and opening it in your downloads file.
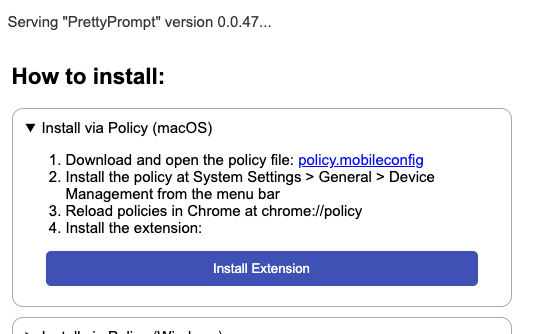
You’ll need to enable this on your Mac, so head over to Device Management in your Mac settings and double click to install.
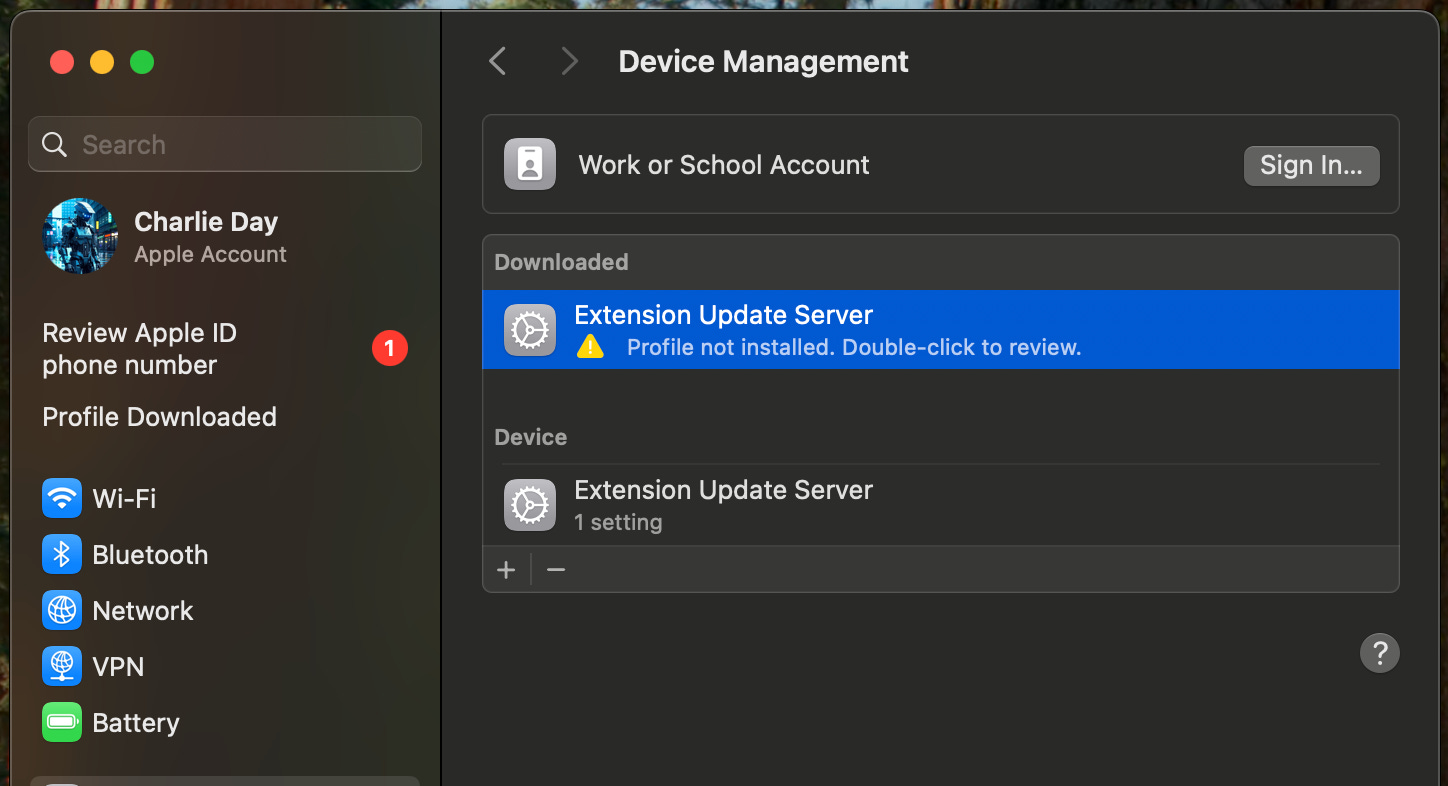
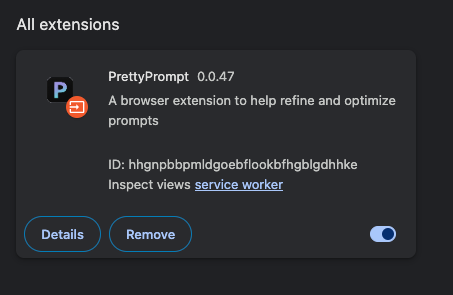
What this will do is update your chrome://policy to basically say allow the specific Extension ID on ExtensionInstallAllowlist key. Once installed head over to chrome://policy and be sure to click Reload and you should see something like below where the Policy Value has an ID that matches the Chrome Extension e.g. in this case it is:
hhgnpbbpmldgoebflookbfhgblgdhhke

Head back to chrome://extensions and you’ll see that you no longer have a warning and your extension should be accepted!
So, how do we make sure of this going forward? We simply need to make sure when we click Pack extension for future versions we include the same key e.g. the dist.pem
Note: Every individual you want to upload the Development Extension to will have to update their policy with the method above.
Conclusion
2 Methods for sharing a Chrome extension to QA within the team.
Method 1 allows you to keep the same ID but is a bit restrictive and only lets you test one release at a time.
Method 2 is a bit more robust and flexible and while a bit more technical to set up allows you to easily share multiple different releases regardless of whether the latest release is out of review.
If you want to check out more on what we’re building you can take our Chrome Extension for a spin!